
You’ve probably watched thousands of videos where the footage seamlessly cuts from someone talking to stunning visuals that perfectly illustrate their point.
That’s B-roll in action. And if you’re creating videos without it, you’re missing out on one of the most powerful tools in video production.
What is B-roll footage, exactly?
It’s the supplementary footage that editors weave between primary shots to add depth, context, and visual interest to videos.
Think of it as the secret ingredient that transforms boring, static videos into engaging content that keeps viewers hooked from start to finish.
Whether you’re a marketer creating short-form video content, an influencer building your brand, or a small business owner trying to stand out on social media, understanding B-roll will completely change how you approach video creation.
Key Takeaways
- B-roll is supplementary footage that complements your primary footage (A-roll) by adding visual variety, context, and professional polish to videos
- The ideal ratio is 60% A-roll to 40% B-roll for documentary-style content, though this varies based on video type and platform
- B-roll serves four critical functions: providing context, smoothing transitions, improving pacing, and reinforcing your message
- Different types of B-roll include establishing shots, detail shots, process footage, reaction shots, and cutaways
- Strategic B-roll usage prevents viewer fatigue and dramatically increases watch time and engagement on social media platforms
Understanding B-Roll Footage: The Basics

The Origin of A-Roll and B-Roll
The terms A-roll and B-roll come from traditional film editing. Back in the analog days, editors worked with two reels of film. The “A roll” contained the primary footage. These were usually interviews, narration, or the main action. The “B roll” held supplementary shots that editors would splice in to support the story.
Today, we don’t use physical reels anymore, but the terminology stuck.
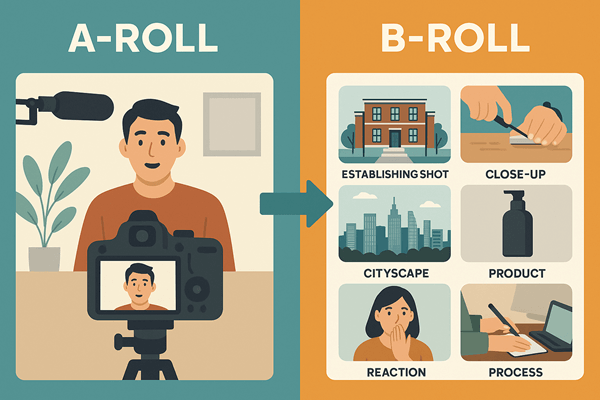
A-roll is your main content. It’s the interview, the talking head, the primary narrative of your video. It’s what drives your story forward and delivers your core message.
B-roll is everything else. It’s the footage that illustrates, emphasizes, and enhances what your A-roll is saying.
When someone in your video talks about their morning coffee routine, the B-roll shows the coffee being poured, steam rising from the cup, and hands wrapping around the warm mug.
Why the Distinction Matters
Here’s the thing: A-roll tells your story. B-roll shows your story.
Without B-roll, you’re stuck with a static shot of someone talking.
Maybe they’re interesting.
Maybe they’re not.
But even the most charismatic speaker can’t hold attention for long when the visual never changes.
B-roll breaks up that monotony.
It gives viewers something fresh to look at every few seconds. It provides visual proof of what’s being discussed. And it creates opportunities for creative storytelling that A-roll alone simply can’t achieve.
What is B Roll Footage Used For? Key Functions and Benefits
Creating Context and Setting the Scene
B-roll establishes where you are and what’s happening. Those wide shots of a city skyline, the exterior of a building, or the bustling activity in an office? That’s B-roll doing its job.
Establishing shots orient your viewer. They answer the unspoken questions: Where are we? What’s the environment? What’s the vibe?
For marketers and business owners, this context is crucial. If you’re showcasing a product, B-roll can show the manufacturing process, the materials being used, or happy customers using it. If you’re explaining a service, B-roll can demonstrate it in action.
Smoothing Transitions and Covering Edits
Ever notice how professional videos flow seamlessly from one point to the next? That’s B-roll working behind the scenes.
When you edit an interview or talking-head video, you’ll inevitably need to cut out mistakes, long pauses, or irrelevant tangents.
Without B-roll, these cuts create jarring “jump cuts” where the speaker seems to teleport slightly.
B-roll covers these edits perfectly. When you cut out a section of dialogue, you simply overlay B-roll footage during the transition. The audio continues smoothly while the visual shifts to something relevant. The viewer never notices the edit.
Pro tip: Transition shots should typically run 3-5 seconds. Long enough for viewers to process the visual information, short enough to maintain momentum.
Preventing Talking-Head Fatigue
Let’s be honest: watching someone’s face for three minutes straight gets boring.
Fast.
This is “talking-head fatigue,” and it’s the enemy of viewer retention. Even if your content is valuable, people will click away if the visual doesn’t change.

B-roll solves this problem by providing visual variety. It gives viewers’ eyes something new to focus on while their ears continue processing your message.
This alternation between faces and action keeps people engaged much longer.
For platforms like TikTok, Instagram Reels, and YouTube Shorts where attention spans are measured in seconds, B-roll isn’t optional.
It’s essential.
Tools like QuickVid make it easier to incorporate engaging B-roll into your video workflow. You’re able to create AI B-roll, access stock footage library, or incorporate your own B-roll.
Reinforcing Your Message and Brand
B-roll doesn’t just fill space, it reinforces what you’re saying. It provides visual evidence and emotional resonance.
If you’re talking about growth, show graphs trending upward. If you’re discussing teamwork, show people collaborating. If you’re highlighting quality, show close-ups of craftsmanship details.
This visual reinforcement makes your message stick. People remember what they see more than what they hear. When your B-roll aligns perfectly with your narrative, you create a powerful one-two punch that drives your point home.
Types of B Roll Footage: A Comprehensive Breakdown
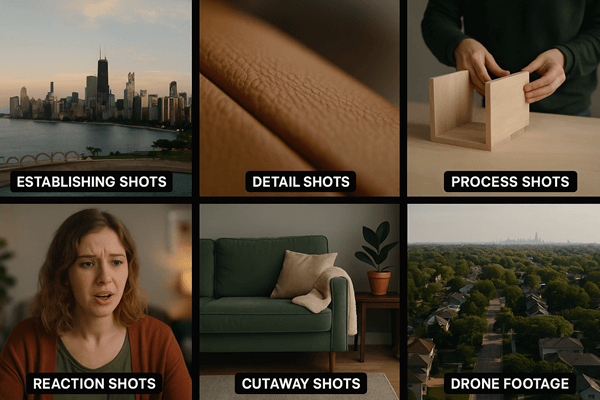
Establishing Shots
These are your wide, expansive shots that set the scene. Think aerial drone footage of a location, wide shots of buildings, or panoramic views of landscapes.
When to use them: At the beginning of videos or when transitioning to new locations or topics.
Example: A video about a coffee shop might open with an establishing shot of the storefront and surrounding neighborhood.
Detail Shots and Close-Ups
These are tight shots that highlight specific elements. They can be textures, products, hands working, or small actions.
Detail shots create intimacy and focus. They draw viewers’ attention to exactly what matters in that moment.
When to use them: When discussing specific products, demonstrating processes, or emphasizing important details.
Example: In a cooking video, close-ups of ingredients being chopped, oil sizzling in a pan, or the final dish being plated.
Process Shots
Process shots show actions happening. That could be someone typing, walking, assembling something, or performing a task.
These shots add energy and movement to your video. They show rather than tell. They’re often paired with a close-up shot for emphasis.
When to use them: When explaining how something works or demonstrating a workflow.
Example: A productivity video might include shots of someone organizing their desk, writing in a planner, or checking items off a list.
Reaction Shots
These capture people’s responses. They could be nodding, smiling, looking thoughtful, or showing emotion.
Reaction shots add human connection and emotional depth. They help viewers relate to the content on a personal level.
When to use them: During interviews, testimonials, or any content involving human experiences. You often see this when a speaker is on stage, the camera will zero in on members of the audience.
Example: In a product review, shots of customers’ faces lighting up when they first use the product.
Cutaway Shots
Cutaways are shots of related but not directly connected elements. They could focus on the environment, other people, or contextual details.
These shots provide breathing room and additional context without directly showing the main action.
When to use them: To add variety, cover edits, or provide environmental context.
Example: During an interview, cutting away to the person’s workspace, awards on the wall, or books on their shelf.
Time-Lapse and Slow Motion
Time-lapse compresses time to show change or progress. Slow motion emphasizes dramatic moments or details.
Both techniques add cinematic flair and can make ordinary actions look extraordinary.
When to use them: Time-lapse for showing processes or passage of time; slow motion for highlighting key moments or adding drama.
Example: Time-lapse of a sunset or city traffic; slow motion of water splashing or a product being unboxed.
Drone Footage
Aerial shots provide unique perspectives and scale that ground-level footage can’t match.
Drone footage adds production value and gives viewers a bird’s-eye view of locations.
When to use them: For establishing shots, showcasing locations, or adding cinematic quality to productions.Example: Aerial views of a corporate campus, event venue, or natural landscape.
📹 B-Roll Shot List Generator
Plan your B-roll footage like a pro
What is B Roll Footage Planning: How to Shoot Effective B-Roll
Pre-Production: Making a Shot List
Don’t just show up and hope for the best. Effective B-roll requires planning.
Before your shoot, create a shot list based on your script or outline. For every major point in your A-roll, list 3-5 B-roll shots that could illustrate it.
Your shot list should include:
- Establishing shots of locations
- Detail shots of key elements
- Process shots showing relevant actions
- Variety in angles and shot sizes
- Backup options in case something doesn’t work
This preparation ensures you don’t miss critical shots and gives you plenty of options during editing.
The 60/40 Rule for Balance
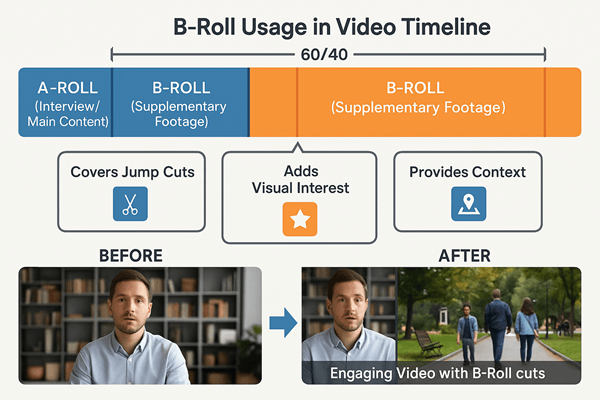
Professional editors often recommend a 60% A-roll to 40% B-roll ratio for documentary-style videos.
This isn’t a hard rule. It varies by content type. Tutorial videos might use more A-roll to keep the instructor on screen. Promotional videos might flip the ratio entirely, using minimal talking heads and maximum visual storytelling.
Consider these ratios for different video types:
- Interviews/Podcasts: 70% A-roll, 30% B-roll
- Product demos: 50% A-roll, 50% B-roll
- Brand stories: 30% A-roll, 70% B-roll
- Social media clips: 40% A-roll, 60% B-roll
The key is maintaining visual variety while keeping your narrative clear.
Shooting Techniques for Quality B-Roll
Get more than you think you need: Shoot at least twice as much B-roll as you plan to use. This gives you options during editing.
Vary your shots: Mix wide, medium, and close-up shots. Change angles. Move the camera. Variety keeps things interesting.
Hold shots longer: Shoot each B-roll clip for at least 10-15 seconds, even if you’ll only use 3-5 seconds in the final edit. This gives you clean entry and exit points.
Think in sequences: Don’t just grab random shots. Shoot sequences that tell mini-stories. For a coffee shop, that might be: beans being scooped, grinder running, espresso pouring, barista handing cup to customer.
Pay attention to lighting and sound: Even though B-roll often doesn’t include sync sound, capture clean audio. You might want those natural sounds in your final mix.
Common B-Roll Shooting Mistakes to Avoid
❌ Shooting too short: Clips under 5 seconds are hard to work with in editing
❌ Ignoring composition: B-roll should be just as well-composed as A-roll
❌ Forgetting continuity: If someone’s wearing a blue shirt in A-roll, they shouldn’t be in red in your B-roll
❌ Shaky footage: Use stabilization or shoot static shots unless movement is intentional
❌ Poor lighting: B-roll should match the lighting quality and color temperature of your A-roll
Integrating B Roll Footage in Post-Production
Editing Workflow and Best Practices
Start with your A-roll. Get your narrative locked down first. Pay attention to things like the pacing, the message, the flow.
Once your A-roll is solid, identify where you need B-roll:
- Where are the jump cuts?
- Where does the visual get stale?
- What points need visual reinforcement?
- Where could transitions be smoother?
Then layer in your B-roll strategically. Don’t just slap it on randomly. Each B-roll clip should serve a purpose.
Timing and Pacing Considerations
The 3-5 second rule: Most B-roll clips should last 3-5 seconds. Shorter feels rushed. Longer feels slow.
Match the energy: Fast-paced content needs quick cuts. Contemplative content can hold shots longer.
Use rhythm: Create visual rhythm by varying shot lengths. Three quick cuts followed by one longer hold creates dynamic pacing.
Respect the audio: Don’t cut B-roll in the middle of important words or sentences. Time your cuts to natural pauses or transitions in the dialogue.
Audio Considerations
B-roll isn’t just visual. The audio matters too.
Options for B-roll audio:
- Keep natural sound: Environmental audio adds realism (coffee shop ambiance, keyboard typing, etc.)
- Lower natural sound: Keep it subtle under the A-roll dialogue
- Replace with music: Use background music instead of natural sound
- Add sound effects: Enhance the B-roll with relevant sound effects
The key is ensuring your A-roll dialogue remains clear and prominent while B-roll audio enhances rather than distracts..
B Roll vs. Other Footage Types: Understanding the Differences
A-Roll: The Primary Narrative
A-roll is your foundation. It’s the interview, the narration, the main speaker delivering your core message.
Characteristics of A-roll:
- Contains primary dialogue or narration
- Drives the narrative forward
- Usually features direct address to camera or interview subjects
- Forms the structural backbone of your video
Without solid A-roll, your video lacks direction. Without B-roll, it lacks engagement. You need both.
C-Roll: The Supporting Cast
C-roll is less commonly discussed, but it exists. It’s additional footage that’s even less essential than B-roll. Bonus material, extended coverage, or alternative angles can fall under this category.
C-roll might include:
- Extra footage that didn’t make the primary edit
- Alternative takes or angles
- Extended sequences for longer versions
- Background footage for potential future use
Unlike B-roll, which is specifically selected to complement A-roll, C-roll is more of a “nice to have” archive.
Stock Footage: When You Can’t Shoot Your Own
Sometimes you need footage you can’t shoot yourself. These include historical events, exotic locations, or specialized scenarios.
Stock footage fills this gap. It’s pre-shot footage you can license and use in your videos.
Pros of stock footage:
- Access to footage you couldn’t shoot yourself
- Professional quality
- Time and cost savings
- Huge variety available
Cons of stock footage:
- Can look generic or overused
- Licensing costs
- May not perfectly match your specific needs
- Less authentic than original footage
For social media creators and small businesses, platforms like QuickVid offer access to stock footage libraries, making it easier to create professional-looking content without expensive shoots.
Sourcing B Roll Footage: DIY vs. Stock vs. AI
Shooting Your Own B-Roll
Advantages:
- Complete creative control
- Authentic to your brand and message
- No licensing restrictions
- Can be reused indefinitely
- Builds a custom library over time
Disadvantages:
- Time-intensive
- Requires equipment and skills
- Weather and location dependent
- May need permits or permissions
Best for: Brands building long-term content libraries, creators with specific visual needs, and anyone wanting authentic, original footage.
Using Stock Footage Libraries
Advantages:
- Immediate access to vast libraries
- Professional quality
- Footage of places/things you can’t access
- Time-saving
Disadvantages:
- Licensing costs (can range from -0+ per clip)
- Risk of overused footage
- May not perfectly match your needs
- Less authentic feel
Best for: One-off projects, footage of inaccessible locations, supplementing original footage, or quick turnarounds.
Popular stock footage sources:
- Shutterstock
- Adobe Stock
- Pond5
- Storyblocks
- Pexels (free)
- Pixabay (free)
AI-Generated and Automated Solutions
The newest frontier in B-roll is AI-generated footage and automated video creation.
Platforms like QuickVid are pioneering automated video creation that intelligently matches B-roll to your content.
Advantages of AI-assisted B-roll:
- Massive time savings
- Intelligent matching to content
- Access to large footage libraries
- Consistent quality
- Scalable for high-volume content creation
Current limitations:
- Less creative control than manual selection
- May occasionally miss nuanced context
- Still developing technology
For creators such as influencers, marketers, and small business owners that produce multiple videos a week, AI-assisted tools represent a game-changing efficiency boost.
Common B Roll Footage Mistakes and How to Avoid Them
Mistake #1: Using Irrelevant B-Roll
The footage might be beautiful, but if it doesn’t support what’s being said, it’s worse than useless. It’s distracting.
The fix: Every B-roll clip should have a clear purpose. Ask yourself: “Does this illustrate, emphasize, or enhance what’s being said right now?” If not, cut it.
Mistake #2: Overusing B-Roll
Yes, there’s such a thing as too much B-roll. When you cut away from the speaker too frequently, viewers lose connection with them.
The fix: Let your A-roll breathe. Don’t feel obligated to cover every second with B-roll. Strategic use is more effective than constant cutting.
Mistake #3: Poor Quality B-Roll
Grainy, shaky, or poorly lit B-roll drags down your entire production.
The fix: Maintain consistent quality standards. If your A-roll is shot in 4K with professional lighting, your B-roll should match. If you’re using stock footage, select clips that match your production quality.
Mistake #4: Ignoring Audio
B-roll with distracting or inappropriate audio can ruin an otherwise good video.
The fix: Always check B-roll audio. Either mix it properly under dialogue, replace it with music, or remove it entirely. Never let it compete with your primary audio.
Advanced B Roll Techniques and Creative Uses
Building Narrative Through B-Roll Sequences
Instead of random individual shots, create mini-stories with B-roll sequences.
Example sequence for a morning routine video:
- Alarm clock going off (close-up)
- Hand reaching to turn it off (medium shot)
- Feet hitting the floor (detail shot)
- Person stretching (wide shot)
- Walking to kitchen (tracking shot)
This sequence tells a story without any dialogue. It creates flow and momentum.
Using B-Roll for Emotional Impact
B-roll isn’t just informational. It’s emotional.
Slow-motion shots of meaningful moments, carefully selected imagery that evokes specific feelings, or symbolic visuals that resonate with your message can create powerful emotional connections.
Techniques for emotional B-roll:
- Slow motion for emphasis and drama
- Golden hour lighting for warmth and nostalgia
- Close-ups of hands or faces for intimacy
- Wide shots for isolation or grandeur
- Movement toward or away from subjects for journey metaphors
Creating Visual Metaphors
Sometimes the most effective B-roll doesn’t literally show what’s being discussed. It represents it metaphorically.
Talking about business growth? Show a plant growing in time-lapse. Discussing overcoming obstacles? Show someone climbing stairs or a runner pushing through the finish line.
These visual metaphors engage viewers’ minds more actively than literal illustrations.
B-Roll for Transitions and Chapter Breaks
Use distinctive B-roll to signal transitions between topics or chapters in longer videos.
This might be:
- A consistent transition shot (like a door opening) between segments
- Title cards overlaid on relevant B-roll
- Montage sequences that summarize or preview content
- Visual palate cleansers that reset the viewer’s attention
Conclusion: Mastering B Roll Footage for Better Videos
B-roll footage isn’t just a nice-to-have element. It’s the difference between amateur videos that viewers skip and professional content that keeps them engaged.
You now understand what B-roll footage is, why it matters, and how to use it effectively. You know the different types, the ideal ratios, the shooting techniques, and the common mistakes to avoid.
Here’s what to do next:
- Start building your B-roll library today: Even if you’re not shooting a specific project, capture interesting footage whenever you can. That coffee shop you visit, your workspace, your daily routine—all potential B-roll.
- Audit your existing videos: Look at your recent content. Where could B-roll have improved engagement? What points needed visual support? Learn from what you’ve already created.
- Experiment with different B-roll styles: Try time-lapse, slow motion, drone footage, or creative transitions. Find what works for your brand and audience.
- Leverage tools that streamline the process: Platforms like QuickVid can help you create professional videos with integrated B-roll faster than ever before, especially if you’re producing content at scale.
- Practice the 60/40 rule: Start with the recommended ratio and adjust based on your content type and audience response.
Now it’s your turn.
Start shooting, start experimenting, and watch your video content transform from forgettable to unforgettable.

