
You’re scrolling through TikTok, and suddenly—boom. A perfectly clipped YouTube video goes viral. 10 million views. Thousands of followers gained overnight. And you’re thinking, “How do I do that?”
Learning how to clip YouTube videos isn’t just a technical skill anymore. It’s a direct path to increasing your income.
Whether you’re a TikTok creator hunting for viral content, an ecommerce marketer looking to repurpose product reviews, or a startup founder trying to maximize every piece of content, knowing how to extract and edit YouTube clips gives you an unfair advantage.
Here’s the truth: YouTube hosts billions of hours of content. Most creators upload long-form videos and never think about repurposing them. That’s your opportunity.
By clipping strategic moments from YouTube videos, you can create dozens of high-performing short-form videos for TikTok, Instagram Reels, and YouTube Shorts—without filming a single second of original footage.
This guide shows you exactly how to clip YouTube videos using multiple methods, from YouTube’s native tools to professional third-party platforms. More importantly, I’ll show you how to turn those clips into profit.

Key Takeaways
- YouTube’s native Clip tool creates 5-60 second shareable clips directly on the platform, but doesn’t allow downloads
- Third-party tools like Kapwing, VEED.IO, and Descript enable MP4 exports and advanced editing for cross-platform distribution
- Optimal clip lengths vary by platform: 9-45 seconds for TikTok/Reels, 15-60 seconds for branded content, 30-90 seconds for scheduled posts
- Mobile and desktop methods each have unique advantages. Mobile offers quick sharing, desktop provides precision editing
- Monetization strategies include affiliate marketing, building niche channels, and creating content libraries for clients
Understanding YouTube’s Built-In Clip Tool
YouTube rolled out its native clipping feature to help creators and viewers share memorable moments without downloading software. It’s simple, fast, and perfect for quick shares. But it has limitations you need to know about.
The built-in clip tool creates segments between 5 and 60 seconds long. Each clip gets a unique shareable URL that links back to the original video. This is brilliant for engagement and attribution, but problematic if you want to download the clip for use on other platforms.
Here’s what you can do with YouTube’s native tool:
- Create shareable clips that live on YouTube’s servers
- Add custom titles to your clips
- Share clips directly to social media platforms
- Maintain attribution to the original creator
Here’s what you can’t do:
- Download clips as MP4 files
- Edit clips beyond basic trimming
- Remove watermarks or branding
- Use clips offline
For TikTok creators, Instagram creators, and marketers who need downloadable content, you’ll need to combine YouTube’s tool with other methods.
But understanding the native tool is still valuable because it’s the fastest way to test which moments from a video have viral potential.
How to Clip YouTube Videos on Desktop (Step-by-Step)
Desktop clipping gives you precision. You’re working with a larger screen, better timeline controls, and easier access to advanced tools. Let me walk you through the exact process.
Method 1: Using YouTube’s Native Clip Feature
- Find the video you want to clip and start playing it
- Look for the scissors icon below the video player (between the “Share” and “Save” buttons)
- Click the scissors icon to open the clipping interface
- Drag the blue handles on the timeline to select your start and end points (5-60 seconds maximum)
- Add a descriptive title for your clip (this helps with discoverability)
- Click “Share Clip” to generate your unique URL
- Copy and share the link across your social channels
Pro tip: The clip title you choose affects how people find your content. Use keywords that describe the exact moment, not generic phrases like “funny moment.”
Method 2: Using YouTube Studio for Your Own Videos
If you’re clipping your own content, YouTube Studio offers more control. This is perfect for creators who want to repurpose their long-form content into short-form video for different platforms.
- Navigate to YouTube Studio and sign in
- Click “Content” in the left sidebar
- Select the video you want to edit
- Click “Editor” in the left menu
- Use the “Trim & Cut” feature to select specific segments
- Drag the blue handles at both ends of the timeline for precise control
- Preview your edit before saving
- Save your changes (this creates a new version of your video)
The downside? YouTube Studio edits your original video. It doesn’t create a separate downloadable clip. For that, you need third-party tools.
Method 3: Third-Party Desktop Tools
This is where things get powerful. Tools like Kapwing, VEED.IO, and Descript let you download YouTube clips as MP4 files, add custom edits, and prepare content for cross-platform distribution.
Kapwing workflow:
- Copy the YouTube video URL
- Paste it into Kapwing’s video editor
- Use the timeline to select your clip segment
- Add text overlays, captions, or effects
- Export as MP4 in your desired resolution
Descript’s AI advantage:
Descript takes clipping to another level with its Underlord AI assistant. Upload a YouTube URL, and the AI automatically identifies and creates multiple clips based on the most engaging moments.
This can be powerful if you don’t have the ability to find the right moments or you don’t have the time to do so. Instead of rewatching the entire video to pick out moments, it’s taken care of for you.

How to Clip YouTube Videos on Mobile
Mobile clipping is about speed. You’re probably on the go, you spot a viral moment, and you want to share it immediately. YouTube’s mobile app makes this possible, but with different limitations than desktop.
Using the YouTube Mobile App
- Open the YouTube app on your iPhone or Android device
- Find and play the video you want to clip
- Tap the “Share” button below the video
- Select “Create Clip” from the share menu
- Adjust the timeline slider to choose your 5-60 second segment
- Add a title for your clip
- Tap “Share Clip” to generate the link
- Choose where to share (text, social media, etc.)
The mobile experience is streamlined but limited. You can’t download clips directly (like with desktop), and editing options are minimal.
The Screen Recording Workaround
Here’s a method many creators don’t talk about: screen recording. It’s not elegant, but it works when you need a quick clip for immediate use.
iPhone:
- Add Screen Recording to Control Center (Settings → Control Center)
- Play the YouTube video
- Swipe down and tap the record button
- Record the segment you need
- Stop recording
- Edit the video in Photos app to trim excess footage
Android:
- Swipe down to access Quick Settings
- Tap Screen Record
- Play the YouTube video segment
- Stop recording
- Edit in Google Photos or your preferred video editor
Important note: Screen recording captures everything on your screen, including notifications. Turn on Do Not Disturb mode first. Also, screen recordings include your device’s aspect ratio, which might not be ideal for vertical platforms like TikTok.
Advanced Clipping Techniques for Maximum Profit
Now we’re getting to the good stuff. Anyone can clip a video. But profitable clipping requires strategy, optimization, and understanding what performs on each platform.
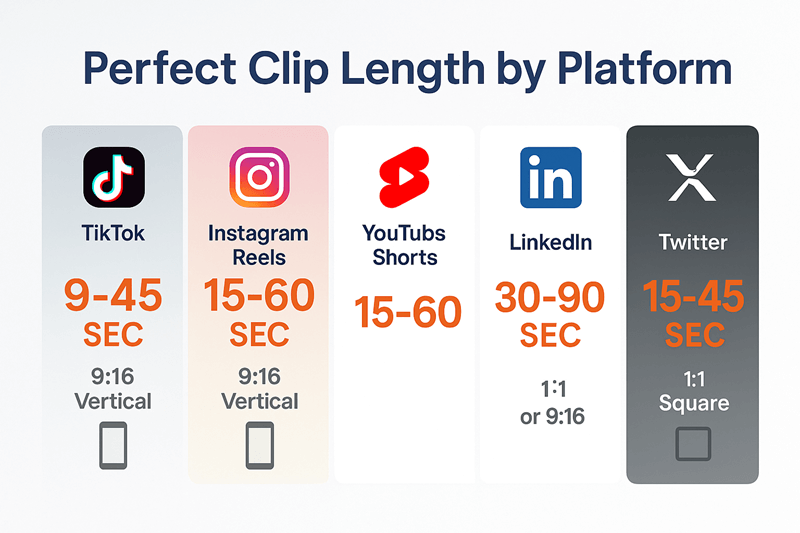
Optimal Clip Lengths by Platform
Not all clips are created equal. Each platform has sweet spots that maximize engagement and algorithmic favor.
| Platform | Optimal Length | Aspect Ratio | Best Use Case |
| TikTok | 9-45 seconds | 9:16 (vertical) | Trending topics, reactions, quick tips |
| Instagram Reels | 15-60 seconds | 9:16 (vertical) | Branded content, tutorials, behind-the-scenes |
| YouTube Shorts | 15-60 seconds | 9:16 (vertical) | Educational content, entertainment |
| 30-90 seconds | 1:1 or 9:16 | Professional insights, thought leadership | |
| Twitter/X | 15-45 seconds | 1:1 (square) | News clips, reactions, commentary |
Shorter isn’t always better. TikTok’s algorithm favors completion rate over raw length. A 45-second clip with a 90% completion rate outperforms a 15-second clip with a 60% completion rate.
Identifying High-Value Moments to Clip
The difference between a viral clip and a dud often comes down to moment selection. Look for these high-value segments:
🎯 Pattern Interrupts: Moments where something unexpected happens
💡 Aha Moments: When someone shares a surprising insight or revelation
😂 Emotional Peaks: Laughter, shock, inspiration, or controversy
📊 Data Reveals: Specific numbers, statistics, or results
🔥 Controversial Takes: Opinions that spark discussion (use carefully)
✨ Before/After Reveals: Transformations or dramatic changes
Watch the first time through for content. Watch the second time, looking for these moments. Mark timestamps. Then create multiple clips from a single source video.
Adding Value to Your Clips
Raw clips are good. Enhanced clips are profitable. Here’s how to add value:
Captions are non-negotiable. 85% of social media videos are watched without sound. If your clip doesn’t have captions, you’re losing the majority of potential viewers. Tools like QuickVid can automatically generate and style captions for your clips.
Strategic text overlays highlight key points. When someone says “I made ,000 in my first month,” put that exact number on screen in large, bold text. Make it impossible to miss.
Hook optimization matters more than ever. The first 3 seconds determine whether someone keeps watching. Consider adding a text hook before the clip even starts: “Wait for what he says at the end…” or “This changed everything about how I…”
Background music can transform a clip from boring to engaging. But be careful with copyright. Use royalty-free music from platforms like Epidemic Sound or Artlist, or leverage platforms that handle licensing automatically.
Monetization Strategies: Turning Clips into Cash
Knowing how to clip YouTube videos is the skill. Monetizing those clips is the business. Here are proven strategies to turn clipping from a hobby into a side hustle that pays.
Strategy 1: Build Niche Compilation Channels
Find a profitable niche. This can be business advice, fitness transformations, real estate investing etc. Create compilation channels using clips from multiple sources. Add commentary, organize by theme, and build an audience.
Revenue sources:
- YouTube AdSense (once you hit monetization requirements)
- Affiliate links in descriptions
- Sponsored content from brands in your niche
- Digital product sales to your audience
I know creators running compilation channels that generate ,000-,000 monthly from AdSense alone. The key is consistency and niche selection.
Strategy 2: Affiliate Marketing with Product Review Clips
This is incredibly effective for ecommerce marketers. Find YouTube reviews of products in your niche, clip the most compelling moments, and share them with your affiliate links.
Example workflow:
- Find a detailed review of a trending product on YouTube
- Clip the 30-second segment where the reviewer shows the best feature
- Add a text overlay: “Link in bio for 20% off”
- Post to TikTok/Reels with your affiliate link in bio
- Repeat with different products daily
One marketer I know built a six-figure business doing exactly this with tech products. He never filmed a single review himself. He just strategically clipped and distributed existing content with proper attribution.
Strategy 3: Content Creation Services for Businesses
Most businesses don’t have time to repurpose their content. You can do it for them. Offer a service where you take their long-form YouTube videos and create 20-30 optimized clips for their social channels.
The funny thing is that you can use third-party tools to do the heavy lifting of finding, clipping, and editing.
This works especially well for podcasters, coaches, consultants, and B2B companies who create regular video content but struggle with distribution.
Strategy 4: Trend Jacking for Rapid Growth
Monitor trending topics on TikTok and Twitter. When something goes viral, find related YouTube content, clip the relevant moments, and publish immediately with trending hashtags.
Speed matters here. Being first or early to a trend can mean the difference between 1,000 views and 1 million views. Set up Google Alerts and social listening tools for your niche topics.
Legal Considerations and Best Practices
Let’s talk about the elephant in the room: copyright and fair use. Clipping someone else’s content isn’t automatically legal just because you’re sharing it.
Understanding Fair Use
Fair use is complex, but here are the basics. Your clip is more likely to be considered fair use if it:
- Transforms the original content by adding commentary, criticism, or new context
- Uses only what’s necessary (shorter clips are better than longer ones)
- Doesn’t replace the original in the market
- Serves educational, commentary, or news purposes
Simply reuploading someone’s best moments without transformation probably isn’t fair use. Adding your own commentary, analysis, or educational context strengthens your position.
Best Practices for Ethical Clipping
Always credit the original creator. Include their name and a link to the full video in your description. This isn’t just ethical—it’s smart. Creators are more likely to share your clip if you’re driving traffic back to them.
Ask permission when possible. Many creators are happy to have their content shared if you ask. A simple DM can prevent future headaches.
Avoid monetizing others’ content without explicit permission. Using clips for engagement and audience building is one thing. Running ads on someone else’s content without permission is another.
Use platforms that handle licensing. Some tools and platforms have agreements with content creators that allow legal use of their content. This is the safest route for commercial purposes.
For more insights on creating content ethically and effectively, check out our marketing tips section.
Tools Comparison: Finding Your Perfect Clipping Solution
You’ve got options. Lots of them. Here’s how the major tools stack up for different use cases.
YouTube Native Clip Tool
Best for: Quick sharing, maintaining attribution, testing moments
Limitations: No downloads, no editing, clips stay on YouTube
Cost: Free
Ideal user: Casual sharers, community managers
YouTube Studio
Best for: Editing your own content, creating permanent edits
Limitations: Only works on your own videos, modifies originals
Cost: Free
Ideal user: YouTube creators repurposing their own content
Kapwing
Best for: Simple editing, adding text/captions, quick exports
Limitations: Limited AI features, watermark on free plan
Cost: Free (with watermark) or -/month
Ideal user: Small businesses, solo creators, beginners
VEED.IO
Best for: Professional editing, subtitle generation, brand kits
Limitations: Higher price point, learning curve
Cost: -/month
Ideal user: Marketing teams, agencies, professional creators
Descript
Best for: AI-powered clipping, transcription-based editing, batch processing
Limitations: Steeper learning curve, higher cost
Cost: -/month
Ideal user: Podcasters, video producers, content agencies
QuickVid
Best for: Automated short-form video creation at scale, social media optimization
Limitations: Focused on short-form content
Cost: Various plans available
Ideal user: Marketers, influencers, businesses scaling content production
For a comprehensive comparison of AI video tools, check out the best AutoShorts AI alternatives.
Common Mistakes to Avoid
❌ Clipping without strategy. Random clips don’t build audiences. Themed, consistent content does.
❌ Ignoring platform-specific optimization. A clip that crushes on TikTok might flop on LinkedIn. Adjust your approach.
❌ Forgetting the hook. If the first 3 seconds don’t grab attention, nothing else matters.
❌ Over-editing. Sometimes the raw moment is more powerful than the polished version. Don’t over-produce.
❌ Inconsistent posting. Algorithms reward consistency. Posting 5 times one week and zero the next kills your reach.
❌ Not testing. You don’t know what works until you test. Create variations and let the data guide you.
❌ Ignoring copyright. One strike can kill your channel. Always err on the side of caution.
❌ Focusing only on views. Views don’t pay bills. Focus on metrics that connect to revenue: clicks, conversions, followers who engage.
Advanced Tips for Power Users
Ready to level up? Here are techniques that separate amateurs from professionals.
The Pattern Recognition Method
After clipping 1,000+ videos, you start seeing patterns. Certain types of moments consistently perform better:
- The unexpected reveal (build-up then payoff)
- The contrarian take (challenging common wisdom)
- The specific number (concrete data beats vague claims)
- The relatable struggle (problems your audience faces)
- The quick win (actionable tips they can use immediately)
Train yourself to recognize these patterns while watching content. Your clipping speed and accuracy will skyrocket.
Multi-Platform Versioning
Don’t create one clip per moment. Create three:
Version A (9:16 vertical): For TikTok, Reels, Shorts
Version B (1:1 square): For LinkedIn, Twitter, Facebook
Version C (16:9 horizontal): For YouTube, embedded content, email
Same content, different packaging. Triple your output with minimal extra work.
The Commentary Overlay Technique
Instead of just clipping, add a brief intro where you appear on camera:
“I just found this incredible tip from [creator name]. Watch what they say about [topic]…”
Then cut to the clip. This adds transformation, strengthens fair use, and builds your personal brand. You’re not just sharing content, you’re curating and contextualizing it.
Thumbnail Testing
Even on platforms without traditional thumbnails, the first frame matters. Test different starting points for the same clip. Sometimes starting 2 seconds earlier or later makes a huge difference in performance.
Measuring Success: Metrics That Matter
You can’t improve what you don’t measure. Track these metrics religiously:
Engagement Rate: (Likes + Comments + Shares) ÷ Views × 100
Watch Time Percentage: How much of your clip people watch
Click-Through Rate: For clips with affiliate links or CTAs
Follower Growth Rate: New followers per 100 views
Revenue Per Clip: Total earnings ÷ number of clips published in a certain period (like 30 days)
Set up a simple spreadsheet or use analytics tools to track these weekly. Look for patterns:
- Which topics perform best?
- Which source channels provide the highest-quality clips?
- What time of day gets the most engagement?
- Which platforms drive the most revenue?
Double down on what works. Cut what doesn’t.
Conclusion: Your Next Steps to Profitable Clipping
You now know how to clip YouTube videos using multiple methods, from native tools to professional platforms. More importantly, you understand how to turn those clips into revenue streams.
Here’s your action plan:
This week:
- Choose your primary clipping tool based on your needs and budget
- Identify 5-10 YouTube channels in your niche with strong content
- Create your first 10 clips using the techniques in this guide
- Set up accounts on your target platforms (TikTok, Instagram, etc.)
This month:
- Establish a consistent posting schedule (minimum 3-5 clips per week)
- Track performance metrics for every clip
- Identify your top-performing content types
- Begin testing monetization strategies (affiliate links, sponsored content, etc.)
The opportunity is massive. YouTube hosts an almost unlimited supply of content. Most creators never repurpose their work effectively.
By learning how to clip YouTube videos strategically, you’re positioning yourself at the intersection of content abundance and distribution opportunity.
The tools are accessible. The methods are proven. The only question is: will you take action? Ready to automate your short-form video creation and scale faster? Check out QuickVid to see how AI can help you create professional clips in minutes, not hours.

